Migrating from another provider to Communiteq’s Discourse hosting is pretty easy, but there are some caveats.
That is why we made this guide. Follow all the steps carefully and everything will be ok in no time!
1. See if this guide will work for you
If you feel uncomfortable with making technical changes, if you have an unusual setup or if you’re moving from another managed hosting provider then you will probably be better off with our Managed Migration.
2. Create a forum with us
by going to https://www.communiteq.com/discoursehosting/pricing/ and following all the steps.
Important: Choose the beta version on the forum creation page.
Do not add your existing hostname yet.
3. Check if we have all your plugins
Please compare the plugins that you are using on your current forum, with the plugins that are installed on our hosting (Admin – Plugins). If we haven’t installed a plugin that you want to use, let us know.
Please note that we only support additional plugins on Professional and Business plans.
4. Prepare for the backup/restore
The backup/restore process is a bit fragile nowadays. A restore will almost certainly fail if you have uploads to s3 configured.
Important: Before starting the backup/restore process, make sure you have Admin – Settings – Files – enable_s3_uploads turned off.
Important: Having SSO enabled can cause issues as well. We recommend to turn Admin – Settings -Login – enable_sso off as well before taking the backup. Don’t forget to enable it again afterwards!
5. Perform a test backup and restore
Create a backup of your existing forum by going to Admin – Backup and clicking the Backup button.
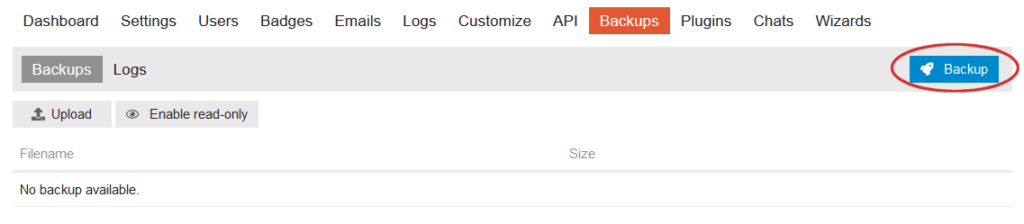
After a while the backup will show up in this screen and you can download it using the Download button. It will send a download link to your associated e-mail account.
Then, go to your forum with us and upload the backup file you have just downloaded.
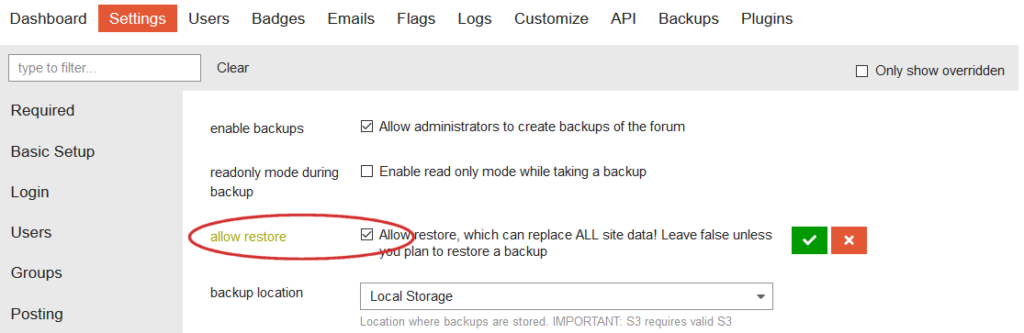
- Go to Admin – Settings – Backups and check ‘Allow Restore’
- Go to Admin – Backups and click the Restore button.
- Check if the restore went successfully. If it didn’t, then don’t worry. Even though you have chosen the beta release when you created your forum in step 2, it is still possible that there are some minor differences between the source forum and the instance you’re trying to restore to. Don’t worry and just contact support. Please leave your uploaded backup online so we can reproduce and fix the issue.
If the restore was successful and your forum is not “live” yet, then you can go to step 6.5 below immediately.
6. Perform the final migration
If everything is ok, you can plan and perform the final migration.
6.1 Prepare the DNS configuration
Make sure the TTL of your existing DNS record is set to a low value (preferably 900 or lower). This makes sure that the migration will go smoothly and your users will end up at the new site pretty quickly. If the TTL is set to a high value, you will need to do this step beforehand and wait the amount of seconds it was set to: if it is set to for instance 3600, you will need to wait for one hour before continuing to the next step.
Other common values are:
- 7200: wait two hours
- 14400: wait four hours
- 21600: wait six hours
- 86400: wait one day
It’s better to adjust this and wait before doing the migration, than having all your users end up in the wrong place after the migration!
6.2 Put up a Global Notice
Put up a Global Notice telling your users that they might encounter a read only forum, and that you are migrating to a new host. Admin – Settings – Other – Global Notice.
6.3 Enable Read Only mode
Go to Admin – Backups and set your existing forum to Read Only using the Enable Read Only button in the top right.
6.4 Backup and Restore
Create a backup like you did in step 6, and restore it to the forum you’re hosting with us. Make sure your existing site stays in Read Only after the backup has been created.
6.5 Finish configuration on the new forum
Remove the global notice on the new forum and enable e-mail.
Don’t forget to enable enable_s3_uploads if you turned it off previously.
6.6 Change the DNS
Go to our Control Panel and change your DNS record according to the instructions.
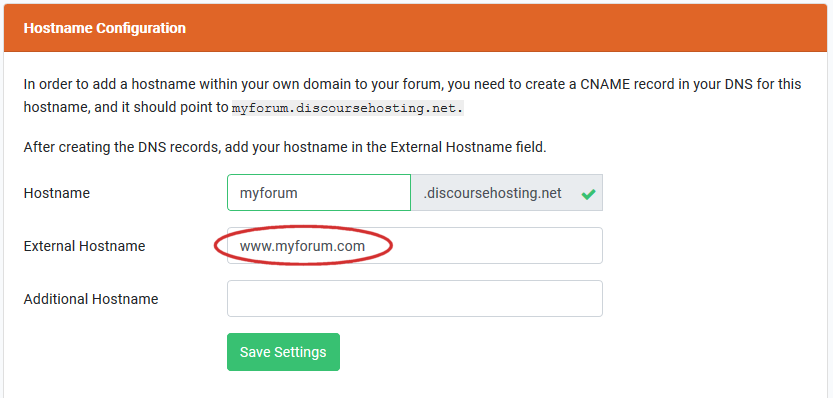
Do not forget to add the host name you want to use to the External Hostname section and save it.
7. Make final changes
If everything went ok, make some final changes.
- Some hosting comes with their own settings for the notification_email and reply_by_mail_address. Make sure to change it to an email address that ends with the host name of your forum, like notifications@forum.example.com and replies+%{reply_key}@forum.example.com
- Set your SPF records according to the instructions in this KB article.
- If your current hosting provider was using a CDN, you want to move away from that. Just contact us and we will help you with this.